- • iMovie tutorials
- 1. iMovie alternatives
- 1.1 iMovie Alternatives for Windows
- 1.2 iMovie Alternatives for Mac
- 2. Basic editing tips for iMovie
- 2.1 How to join clips in iMovie
- 2.2 How to crop/rotate photo/videos in iMovie
- 2.3 How to add voiceover in iMovie
- 2.4 How to correct color in iMovie
- 2.5 How to add background music in iMovie
- 3. Advenced editing tips for iMovie
- See more
How to Record and Add a Voiceover in iMovie

Apr 10,2020• Proven solutions
iMovie allows you record a voiceover either to illustrate the movie scenes or as a comment. Why not use this great iMovie voiceover function? With a built-in or external microphone, it is very easy to narrate a movie and add your voice anywhere you want in your video by adding a voiceover in iMovie. Check out this tutorial to learn how to record a voiceover in iMovie and add a voiceover to your iMovie videos.
Using a Windows PC? Don't worry, check the Best iMovie Alternatives for Windows to figure out how to add voiceover to video.
- Part 1: How to do a voiceover in movie using iMovie alternative
- Part 2: How to record and add a voiceover in iMovie
Part 1: How to record a voiceover using iMovie alternative [3 Steps]


Before we get started, I want to recommend one of the best iMovie alternatives to do voiceover. To help you add voiceover successfully, I recommend an iMovie alternative- Wondershare Filmora for Mac to record and add voiceover to video. It's very convenient! Now let's see how to record and add voiceover in IMovie alternative Filmora for Mac.
Step 1. Import your videos to Video Editor
Download and run this software, then import your source videos by clicking File>Add File or locate your videos by the browser to load files from iTunes library, Photo Booth, etc.

Step 2. Record your voiceover
Hit the "Voice Over" button on the toolbar to add a voiceover to your video. Choose your input device and click the red button to start or end recording. When you finish it, hit the "Done" button to save the recording.

Step 3. Export the new file
After recording the voiceover, hit "Export" to save the new file. You can either save it in different formats, upload to YouTube immediately or burn to DVD. Check the video below to see what Filmora can do for you.

Part 2: How to record and add a voiceover in iMovie
In this part, I will show you how to do voiceover narration in iMovie (both iMovie 9/11/10 versions). If you are not sure which version you are using, go to iMovie menu and select About iMovie to check. Since I am using the iMovie 10.1.8, I will show you how to record voiceover and add it to video in iMovie 10 first.
Section 1: How to record and add voiceover in iMovie 10
Recording and adding your own voiceover narration in iMovie 10 is simple, just follow the steps below:
1. Enter Record Voiceover feature
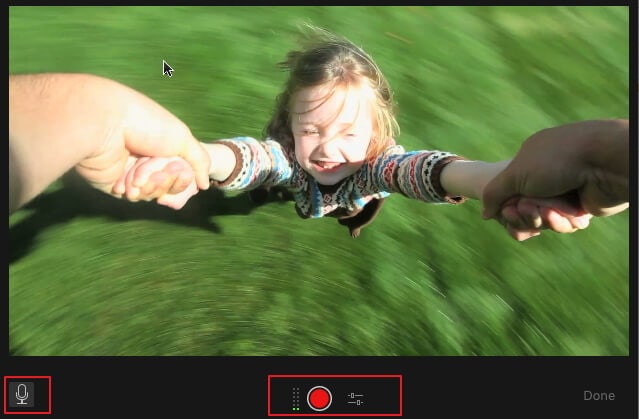
After importing media to the timeline, place the Playhead to the position where you want to add the voiceover, and then click the Record Voiceover icon below the preview windows.
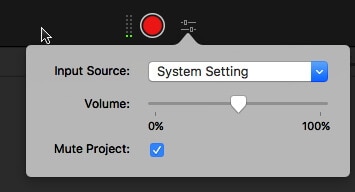
2. Adjust voiceover recording settings
Now you can adjust the narration recording settings before recording:
Click the Voiceover Option icon and then you can select the desired Input Source and change the voiceover volume as well. Just drag the volume slider right or left to increase or decrease the recording volume. If you check the Mute Project checkbox, iMovie will mute sound from clips when recording, which is normally recommended during recording.
3. Start and Stop Voiceover Recording
Click the red Record button to start voiceover recording. Click the Record button again to stop recording and the recorded voiceover will appear in the timeline as a new audio clip. After recording all the voiceover narration, click the Done button to the right of the voiceover recording controls.
Above are the steps of how to do voiceover narration recording in iMovie 10. If you have not updated to this version yet, you can check the information below about how to do voiceover on iMovie 11 and iMovie 9.
Section 2: How to do voiceover narration in iMovie 9/11
Related: How to Add Subtitles to Videos and Movies in iMovie
Step 1. Open the voiceover window and choose your microphone
Click the Voiceover button which looks like a microphone in the toolbar and you will see a Voiceover menu shown like below. You can choose built-in microphone or use other microphone connected to your Mac.

Step 2. Select your recording settings
Drag the slider to set the input volume of your recording. You can also use the noise reduction and voice enhancement functions to help you record a better voiceover in iMovie.

You may also like: How To Remove Background Noise from Video
Step 3. Record voiceover in iMovie
Click any video clip to start recording a voiceover in iMovie. After the voiceover settings, the preview window will give you the instruction, asking you to click a clip to start recording.

When you are recording, a red shadow will cover the video clip to show that you are recording. To stop a voiceover recording, you can click anywhere in the project. The finished voiceover will appear in purple icon below the videos where your voiceover is added. You can drag the slider to extend or shorten the voiceover. To adjust the voiceover in iMovie, you can choose the voiceover clip, hit the gear in the front and choose Clip Trimmer, Clip Adjustments, and Audio Adjustments to make modifications to the iMovie voiceover. You may also need Fade in and Fade out Audio Files in iMovie.

So, above are the steps about how to do voiceover narration in iMovie and iMovie alternative Filmora for Mac. If you are wondering why Filmora for Mac is recommended, you can check the video below about how to edit video with it on Mac. Download and have a try and let us know your opinion about Filmora for Mac.
Bring up your video to a professional level with straightforward tools.
Try It Free Try It Free
Liza Brown
chief Editor
0 Comment(s)